
Your Ultimate Guide to The ‘Blue Bottle’ Experiment | Methylene Blue Science Experiment
Looking for a fun science experiment to show your children or grandchildren? Or perhaps you’re a student and want your science teacher to do something interesting in class. Either way, the answer is The Blue Bottle Experiment! It’s fun, looks like a magic trick and you’ll learn something valuable from it.
The Blue Bottle Experiment is a classic chemistry experiment involving a medicinal blue dye called methylene blue, which you can use to impress all your friends and family.
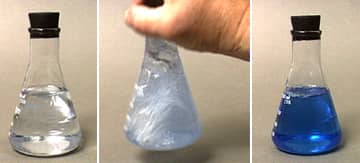
High school chemistry teachers often use The Blue Bottle Experiment to illustrate the concept of oxidation and reduction reactions to their students. In the experiment, a methylene blue solution is “magically” transformed from blue to colourless, and then back again by shaking it. The interesting thing is that it’s not magic at all; the fascinating phenomenon just takes a basic understanding of chemistry to explain.
How it Works
Methylene blue is a synthetic chemical that comes in crystalline form. When dissolved in water it yields a blue liquid. And when sugar is added to the water, a reaction takes place between the sugar and the methylene blue, which turns the solution colorless.
When you shake the colorless liquid, the methylene blue reacts with oxygen (introduced by the shaking), which restores the blue color.
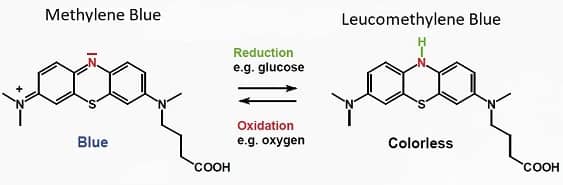
The color change occurs because methylene blue exists in two forms. The first is a reduced form, which is colorless, and the other is an oxidized form, which is blue.
The fact that methylene blue can shift back-and-forth between oxidized and reduced is why they call it a redox agent. This characteristic also explains how it helps prevent oxidant production within cellular mitochondria, which keeps the metabolism within your cells operating efficiently.
This flip-flop from colored liquid to clear liquid can be performed a number of times in this experiment until either the oxygen or the glucose in the bottle are fully consumed.
Once this happens, you can add additional oxygen by uncapping the liquid for a few moments to let fresh air into the bottle, or you can add more glucose to the solution and continue the experiment.
Now that you have a basic understanding of how it works, here are the materials you’ll need to conduct the experiment.
TABLE OF CONTENTS
Materials needed:
- Glucose
- 1% methylene blue solution
- Potassium hydroxide
- Distilled water
- 500mL flask with stopper
- 500mL graduated cylinder
- 2 x weighing dishes
Preparation:
Prepare your “blue bottle” solution with the following four steps.
- Begin by adding 300mL of distilled water to your 500mL flask.
- Add 8 grams of potassium hydroxide to the water, and stir until the solid is dissolved.
- Add 10 grams of glucose and a few drops of methylene blue to that same flask and fill the remainder with water until it reaches the 500mL mark.
- Once complete, cap the flask with your stopper and mix thoroughly.
Procedure:
Once you’ve prepared the solution, you can either transfer it to a water bottle and put the caps on, or leave it in the 500mL flask and cap it with a stopper. Using a water bottle you can probably surprise people more easily, as they will not suspect it and probably be more shocked and amazed by the color change.
Whichever receptacle you choose, set the bottle down and let it rest undisturbed for a few minutes until the solution becomes colorless.
Now your ‘magic’ blue bottle demonstration is ready!
Pick up the bottle and show everybody the clear “water” inside. Then gently shake it and watch it turn blue. Voila! The universe just folded inside out for everybody watching.
Once the solution inside your bottle is entirely blue, put it down and let it rest until the liquid becomes clear once again.
Repeat this process as many times as you’d like. At some point, you will need to remove the cap to re-introduce more oxygen into your bottle or add more glucose.
Disposal:
After you’re done with your magic show, flush the methylene blue solution down the drain and feel good that you’ve added something beneficial to the water supply that will protect all life everywhere.
The Blue Bottle Experiment is a simple and timeless experiment that can be done by pretty much anyone to illustrate the reduction and oxidation properties of methylene blue or to get children interested in science.
And to the students out there… Be sure to ask your chemistry teacher to do The Blue Bottle Experiment for you in class at least once a week.
Thanks for reading! If you want to learn more about methylene blue, check out my #1 bestselling book The Ultimate Guide to Methylene Blue.